이 글은 2025년 9월 15일에 작성했음.
001.에서 이미 WSL2는 설치 했으니, Docker를 설치해야 함.
생각보다 간단함.
CPU에서 가상화가 활성화되어 있어야 합니다.
이건 001에서 이미 되어 있는 것을 확인 했을 듯
1. Docker 설치
https://www.docker.com/products/docker-desktop/
Docker Desktop: The #1 Containerization Tool for Developers | Docker
Docker Desktop is collaborative containerization software for developers. Get started and download Docker Desktop today on Mac, Windows, or Linux.
www.docker.com
에서 windows 용 프로그램 설치 파일을 다운로드 받아, 설치합니다.
Step 1: 설치 실행
- Docker Desktop Installer.exe 파일을 더블클릭하여 실행.
- 설치 마법사가 나타나면 다음을 클릭.
Step 2: 설치 옵션 선택
설치 마법사에서 아래 옵션을 확인:
- Enable WSL 2 Windows Features:
- Windows Home 또는 WSL 2를 선호하는 경우 체크 (권장).
- Windows Pro/Enterprise에서는 Hyper-V를 사용할 수도 있지만, WSL 2가 더 가볍고 호환성 좋음.
- Add shortcut to desktop:
- 바탕화면에 Docker Desktop 바로가기 추가 (선택 사항, 체크 권장).
- Use WSL 2 instead of Hyper-V:
- 성능과 호환성을 위해 WSL 2를 선택 (기본적으로 체크).
Step 3: 설치 진행
- 설치 버튼 클릭.
- 설치 과정에서 Windows 방화벽 또는 관리자 권한 요청이 나타날 수 있음. 모두 허용 또는 예 선택.
- 설치가 완료되면 Close and Restart 버튼 클릭.
Step 4: 컴퓨터 재부팅
- 설치 후 컴퓨터를 재부팅해야 Docker Desktop이 제대로 작동.
- 재부팅 후 Docker Desktop이 자동으로 실행됨 (설정에 따라 다를 수 있음).
Step 5: 바탕화면 또는 windows 앱 목록에서 방금 설치한 Docker Desktop 실행
- 처음 실행하면 이용약관 동의하고, 계정 만들거나 연결해서 로그인 합니다.
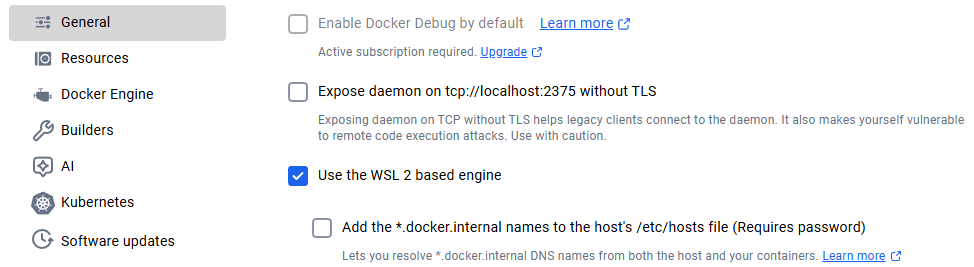
- 아래와 같이 설정합니다.

하나 더,
2. SearXNG 서버 띄우기
위에서 Docker를 WSL2와 연동되어 동작되도록 설정 했으므로, 이제 SearXNG를 설치하면 됩니다. 설치될 폴더를 우선 정합니다. 저는 C:\Data\ML\DockerApp\searxng-docker 라는 폴더를 만들었습니다. 이 폴더에 docker-compose.yml 파일을 새로 메모장으로 생성합니다. 내용은 아래와 같습니다.
version: "3.7"
services:
searxng:
image: searxng/searxng:latest
volumes:
- ./searxng:/etc/searxng
ports:
- "8080:8080"
environment:
- BASE_URL=http://localhost:8080/
- INSTANCE_NAME=MySearXNG
restart: unless-stopped
대충 내용은 searxng/searxng:latest 최신 파일을 다운로드해서 리눅스 시스템 폴더로 카피하고, 8080 포트로 서비스하겠다. 뭐 이런 내용입니다. Docker가 이 파일을 로딩하면서 작업할 내용들 입니다.
그리고, 다음 순서로 같은 폴더에 서브로 searxng 이라는 폴더를 생성합니다.
자, 이제 띄워볼까요?
windows 파워셀에서
docker-compose up -d
라고 치면,

이렇게 정상적으로 러닝이 됩니다.
자, 그럼 크롬에서 아래와 같이 접속해보세요.
http://localhost:8080/
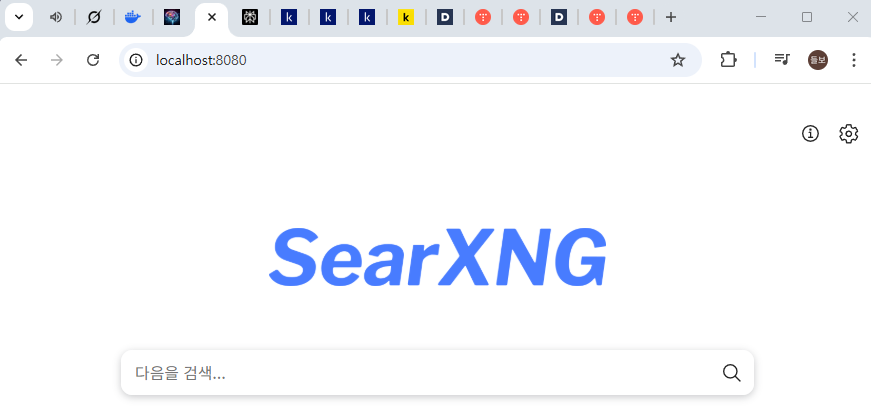
이렇게 나오면 정상적으로 된 것입니다.
아까 생성한 searxng 폴더에 settings.yml 이라는 파일이 디폴트 값으로 생성이 되었을 겁니다.
그 내용을 아래처럼 입맛에 맞게 변경하면 됩니다. engines, ui 부분을 검색해서 원하는 내용을 추가합니다. 구글과 다음을 검색 엔진으로 사용한다는 설정입니다.
engines:
- name: google
enabled: true
- name: bing
enabled: false - name: daum
engine: daum
api_key: "d8******************a29937588" # https://developers.kakao.com/ 에서 발급받은 REST API 키
enabled: true
물론 위 내용을 적용하려면 파워셀에서
docker-compose down
docker-compose up -d
라고 입력하면 됩니다.
3. Python에서 검색어를 입력하고 결과를 받아오기
이에 앞서 설정할 것이 있어. 앞서 settings.yml 을 오픈하고, formats: 부분과 server: 부분을 찾아서 아래처럼 해줘
formats:
- html
- json #json 포맷도 지원
server:
# Is overwritten by ${SEARXNG_PORT} and ${SEARXNG_BIND_ADDRESS}
port: 8080
bind_address: "0.0.0.0" # 모든 접근 방식을 허용한다는 의미
# public URL of the instance, to ensure correct inbound links. Is overwritten
# by ${SEARXNG_BASE_URL}.
base_url: "http://localhost:8080/"
# rate limit the number of request on the instance, block some bots.
# Is overwritten by ${SEARXNG_LIMITER}
limiter: false
# enable features designed only for public instances.
# Is overwritten by ${SEARXNG_PUBLIC_INSTANCE}
public_instance: false
# If your instance owns a /etc/searxng/settings.yml file, then set the following
# values there.
secret_key: "Wsj0YUFTJmJnzl6A6VufEso9xd4AabU" # Is overwritten by ${SEARXNG_SECRET}
# Proxy image results through SearXNG. Is overwritten by ${SEARXNG_IMAGE_PROXY}
image_proxy: false
# 1.0 and 1.1 are supported
http_protocol_version: "1.0"
# POST queries are "more secure!" but are also the source of hard-to-locate
# annoyances, which is why GET may be better for end users and their browsers.
# see
https://github.com/searxng/searxng/pull/3619
# Is overwritten by ${SEARXNG_METHOD}
method: "POST"
default_http_headers:
X-Content-Type-Options: nosniff
X-Download-Options: noopen
X-Robots-Tag: noindex, nofollow
Referrer-Policy: no-referrer
features:
api: true # API 활성화
이렇게 설정했다면, 다시 시작해.
그리고, 다음과 같은 파이썬 작업을 해봐. 그럼 결과가 잘 나와야해.

'머신러닝' 카테고리의 다른 글
| 005. Whisper & Wiki 를 docker / fastapi 사용하기 (0) | 2025.09.29 |
|---|---|
| 004. Nemo Docker에 띄우기 (0) | 2025.09.22 |
| 000. 유용한 정보 (0) | 2025.09.18 |
| 003. OpenVoice 설치 및 내 목소리로 음성 만들기 (0) | 2025.09.17 |
| 001. windows에서 vllm 사용해 보기 (0) | 2025.09.10 |
